Monday, September 15, 2014

Analysis: A year of running office on solar power

An year ago, on 15-Sep-2013, we started using solar power to power our office. We set up a 5 kilowatt solar plant on the roof of our office space (see picture attached. Click on images to enlarge) and started collecting data to keep track of how beneficial it would be for us. After an year of collecting data of electricity consumption, here is our analysis.
 
Equipment:
  1. 20 panels of 240 W each (= 4.8 kW)
  2. Grid sharing UPS to manage solar power, power from electricity board (EB) and battery bank
  3. 16, 40 AH batteries of 12 V each (= 192 V)
Data capture:
  We installed 2 energy meters. One recorded electricity used from electricity board (Meter 1) and another one recorded total electricity consumption (Meter 2). The difference of the two would be electricity generated from solar power. We installed a battery bank after one month of operation and the difference between Meter 1 and Meter 2 now denotes electricity used from solar power and battery. As the battery bank doesn't get charged from EB power (and only solar power), we will use solar power as a single term to denote power from solar and battery.
 
 Hourly readings of Meter 1 and Meter 2 were taken. Some more data about battery voltage and solar generation were also noted. Over a period of time number of readings reduced to 3 or 4 in a day. All readings were taken manually on an Excel sheet.
 
Numbers:
 
84% - The percentage of electricity consumption that is provided by solar power since its installation. We started out without having a battery bank. We found out that a passing cloud or little shadow from taller neighbouring objects would reduce solar generation. It can be seen in the gap between red and blue lines in the chart between 18-Sep-2013 and 17-Oct-2013 (click image to enlarge). Without a battery bank, solar power was able to provide 45-50% of total consumption. With the battery bank in place, storage of electricity increased efficiency of the power station. Over the months, we also learnt how to improve the efficiency of batteries.
 
Charts:
 
Weekly consumption (click to enlarge)
 
 Monthly consumption (click to enlarge)
 
As is seen, we were able to generate more power during the summer (March to June), where we not only consumed more power, we were also able to store more during the day. The consumption reduced during winter months as we did not use the air conditioner.
 
Hourly consumption (for May 2014) (click to enlarge)
 The hourly consumption chart of May 2014 shows how solar power is used through the day (red) and by evening, once the battery drains, power from EB is used (blue).
 
Savings:
What were the savings? We compared bills paid out to Electricity Board (EB) between Oct 2012 to Aug 2013 (Period 1) with bills between Aug 2013 to Aug 2014 (Period 2).
Note: Solar station installed Sep 2013) 
We paid Rs. 38,871 in Period 1 and Rs. 13,536 in Period 2. Which accounts for a saving of Rs. 25,335.
 However, that does not reflect the correct picture of savings made. In November 2013, we noticed that our EB meter had become faulty as one digit went in a reverse direction (from 47100 to 46100). We informed the EB of the issue and they installed a new meter in late December. As they didn't have the readings for the intermittent period, they charged us based on previous year readings during same months, when we didn't have a solar power station. The red line in the charts above and below are our calculations of how many units we consumed and what the bill should have been. As per our calculations, we should have paid only Rs. 5,249 in the entire year making a saving of Rs. 33,622.
 
We have also changed over to electronic equipment that consume lesser power over the year.
 
Calculating return on investment (RoI):
 
Update (20-Sep-2014): There were a few queries on Return of Investment (RoI). To track the RoI, we can only use tangibles. Cost of equipment, wiring and installation. And the savings made, going by power consumption at current rates: Rs. 7/per unit + taxes = approx. Rs. 8/unit. Going by that, the RoI is close to 10 years. Since the warranty on the panels is for 15 years, it should be profitable after that. The intangibles, however, are uninterrupted power supply (no worrying about scheduled or unscheduled power shutdown) and clean, consistent power at 230V (no need of additional voltage stabilisers to protect equipment from low or high voltage). These can't be factored in, but make the investment much more beneficial.
 
For more information on our solar power station, feel free to visit our website http://mlcmds.com or contact us via email - mlcmds[at]vsnl.com
 

Saturday, July 12, 2014

Windows 7 --- Copy System Partition to a SSD (on a laptop )

My experience on adding a SSD to an old laptop and copying Windows System Partition

Hardware

  • Existing
    • Acer 5745 with 8 Gb RAM /  DVD  /  500 Gb HDD
  • Upgrade
    • Bought a caddy in Ebay

      Universal 12mm Laptop Optical Bay Hard Disk SATA to SATA 12.7mm HDD Caddy costing INR 750
    • This product is available from seller sitetechnologies.in on ebay.in
    • Bought a SSD 128 Gb from flipkart @ INR 4240


My Experience

  • Backup
    • Used Macrium Reflect to take an image of my C drive (System partition) which contained my Windows 7 OS on an external drive
      • Choose Disk Image and then select the desired System partition
      • Create the Image on the external Media
    • Also created the Windows Recovery Media on a USB device
      • I used a SD Card of 4 gb
      • Choose Other Tasks -> Create Rescue Media -> windows PE
  • Fixing the SSD
    • Opened my laptop (rear 8 screws) and removed my HDD and fixed the SSD in it's place.
  • Restore 
    • Connect the external HDD  containing the System Image
    • Connect the Windows PE media ( In case my SD Card)
    • Started my laptop and choose the F2 / F12 key to start boot from my SD Card (USB)
    • Windows PE rescue will start.
    • Choose the Restore Image option 
    • Choose the Source as  the Image from the external Drive
    • Choose Target as the SSD Drive
    • Complete the Restore and shutdown
    • Start the Laptop and boot from Windows PE Media again
    • Hit Esc to stop the Windows PE from going to the Restore Image menu
    • Use Fix Windows Boot Problems on the SSD Drive
    • Now it will offer to correct the SSD drive
      • Write the MBR and Boot info
    • You are done
    • Reboot and check that the system partition successfully boots
  • Fixing the Hard Drive
    • Now remove the DVD drive 
    • Fix the HDD in the Caddy and push it back
    • Close Laptop
    • Restart the system

Why did I have to shift the Hdd to the Caddy

  • My laptop BIOS cannot identify the HDD connected on the DVD port
  • Of course you can workaround this by using Windows Restore and create a Boot table which would show both partitions allowing you to boot from either

Saturday, August 11, 2012

Installing Oracle Express (XE) 11.2.0


You might run into a problem while installing the Oracle Express on Windows 7 Professional stating that KEY_XE.reg is not available.

Here is the workaround for the above problem
  • As soon as you click on setup.exe it will come up to a start page
  • Now go to a folder C:\Users\[username]\AppData\Local\TEMP and search for a folder where the Oracler installer has expanded the files
  • You will find a file MTS*.reg in that folder.
  • Copy that file as KEY_XE.reg
  • Now go ahead with your installation

Monday, November 29, 2010

Help: Triangle Tennis Trust Tournament Web Registration

Manufacturing Logistics Control has developed a web application to assist the process of registration the annual tennis tournament by Triangle Tennis Trust, Chennai. The application has been deployed on Microsoft's Silverlight platform and the participants registering for the event will be required to have a silverlight plug-in for their browsers.
Following are the steps that will assist you in the registration process.

  1. Step 1: Go to the registration website - http://ttt.mlcmds.com/
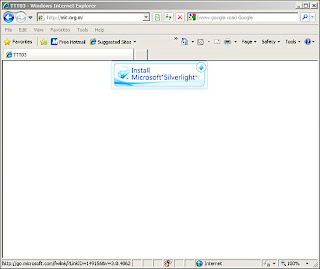
  2. Step 2: Install Silverlight plug-in. (If the plug-in is already installed skip to Step 7)

    Click on the icon to initiate the download of Silverlight from Microsoft's website.
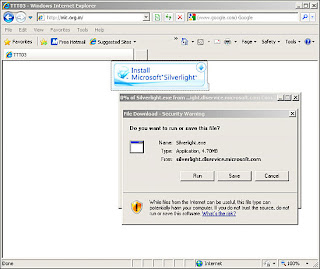
  3. Step 3: You will be prompted to 'Run' or 'Save' the installer file. Click on 'Save' and save the file to a local folder. In case, you have subsequent problems with installation you can utilise this file later.
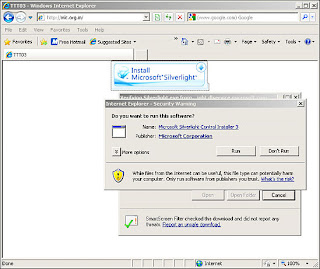
  4. Step 4: Run the downloaded file.
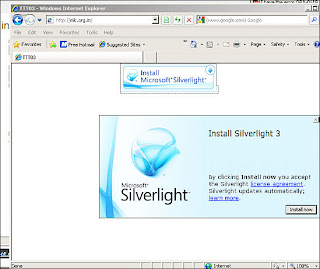
  5. Step 5: Install Silverlight to your computer.

  6. Step 6: The browser will refresh automatically to launch the website. If it does not, then close your browser and try to log on to the website http://ttt.mlcmds.com/ again.
  7. Step 7: Click on the button 'Registration' at the bottom, or click 'Registration' link available on the right under "Quick Links"
  8. Step 8: Pre-registration screen appears requesting the details of the participant.

    • Provide the first name. Do not use a blank space in first name.
    • Provide the last name (or initials). No blank spaces here either.
    • Select the Date of birth (DOB). If you find it difficult to use the buttons available to select date, specify your date in the following format - 12-04-1999 (For a DOB of 12 April, 1999).
    • Select Gender of participant. (M- Male and F-Female)
  9. Step 9: Click the button labeled 'New' to continue with registration.

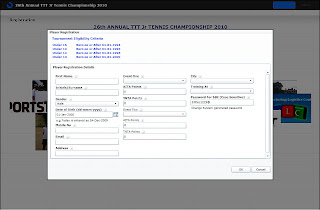
    A window pops up as shown above. (Note: If you are not able to view the buttons 'OK' and 'Cancel' at the bottom of the screen, reduce the zoom level of the browser to less than 100%)
  10. Step 10: Provide further details of the participant.

    • Under 'Tournament Details' select the events for which the participant wishes to register. Use the drop down box for selecting the event.
    • Participant can appear for two events. (For e.g. Boys Under 12 and Boys Under 14). If second event is necessary, select Event 2. Else, leave it blank. You can always correct it using the option 'Clear Selection'.
    • Provide the AITA and TNTA points of the participant for each event.
    • Fill in the Contact Information of the participant.
    • Mention 10-digit Mobile number, E-mail address and postal address
    • Select city of residence of the participant.
    • Select the training centre of the participant. If it doesn't appear in the list, choose 'OTHERS'.
    • Provide a password. (Must contain atleast 6 alphanumeric characters and one number). Password will be required if you wish to edit/change any information provided here, at a later time.
    • Note: Errors, if any, will be shown at the bottom as a summary. On every field a red box will appear next to it, if it is erroneous.
  11. Step 11: After required information is provided, click 'OK' to save the registration details. A window will appear confirming the completion of registration.
  12. Changing Registration details: To change any information provided in your registration details
    • Enter First Name
    • Enter Surname/Initials
    • Select Date of Birth
    • Select Gender
    • Provide the password created during registration
    • Click the button 'Edit'


    Edit the information you have provided and click 'OK' to save the changes made.

And Good luck to the participant for the tournament!

Thursday, February 11, 2010

Recovering Oracle Block corruption

Occurence of Problem:
While trying to login to our application running on Oracle 10g R2 (10.2.0.4) we received the following error:

ORA-01115: IO error reading block from file 1 (block # 94697)
ORA-01110: data file 1: '(...)\SYSTEM01.DBF'
ORA-27091: unable to queue I/O
ORA-27070: async read/write failed
OSD-04006: ReadFile() failure, unable to read from file
O/S-Error: (OS 23) Data error (cyclic redundancy check).


Investigation:

  • Oracle's Metalink pointed out that the problem was a block corruption on the disk.

  • It is a 500GB Seagate SATA disk. The Event Viewer of Windows Server 2008 also gave the 'disk' block corrupt error.

  • A DBVERIFY was done on the corrupted datafile and it returned an O/S Error 0RA-01115.

  • A complete Check Disk was run on the disk and the corrupted block were fixed.

  • DBVERIFY now gave the following error for the datafile

    Corrupt block relative dba: 0x004171e8 (file 1, block 94696)
    Fractured block found during buffer read
    Data in bad block:
    type: 6 format: 2 rdba: 0x004171e8
    last change scn: 0x0000.01c61503 seq: 0x1 flg: 0x06
    spare1: 0x0 spare2: 0x0 spare3: 0x0
    consistency value in tail: 0x00000000
    check value in block header: 0xa06b
    computed block checksum: 0xdfa7
    Reread of rdba: 0x004171e8 (file 1, block 94696) found same corrupted data

    Same error also appears in the alert.log file

  • Attempting to login into the application gave a block corruption error in Oracle in the datafile.

    ORA-01578: ORACLE data block corrupted (file # 1, block # 94696)
    ORA-01110: data file 1: '(...)\SYSTEM01.DBF'

    Do note that it is the previous block ID from last error message

  • Alert.log contained the following information

    Corrupt Block Found
    TSN = 0, TSNAME = SYSTEM
    RFN = 1, BLK = 94696, RDBA = 4289000
    OBJN = 331, OBJD = 331, OBJECT = I_PROCEDUREPLSQL$, SUBOBJECT =
    SEGMENT OWNER = SYS, SEGMENT TYPE = Index Segment


Resolution:
Refer to Oracle's documentation on Detecting and Repairing Data Block Corruption.

  1. Logon to SYS user and create a REPAIR Table:

    BEGIN
    DBMS_REPAIR.ADMIN_TABLES (
    TABLE_NAME => 'REPAIR_TABLE',
    TABLE_TYPE => dbms_repair.repair_table,
    ACTION => dbms_repair.create_action,
    TABLESPACE => 'USERS');
    END;

  2. Check the Object for corruption

    DECLARE num_corrupt INT;
    BEGIN
    num_corrupt := 0;
    DBMS_REPAIR.CHECK_OBJECT (
    SCHEMA_NAME => 'SYS',
    OBJECT_NAME => 'I_PROCEDUREPLSQL$',
    OBJECT_TYPE => dbms_repair.index_object,
    REPAIR_TABLE_NAME => 'REPAIR_TABLE',
    CORRUPT_COUNT => num_corrupt);
    DBMS_OUTPUT.PUT_LINE('number corrupt: ' || TO_CHAR (num_corrupt));
    END;

    Note: If parameter Object Type is ignored, it takes the default as TABLE_OBJECT and the query will return a table or view not found error. The object turned out to be an INDEX OBJECT.

  3. Command - "select * from repair_object" will show the corrupt blocks and associated information

  4. Fix the errors using the following code:

    DECLARE num_fix INT;
    BEGIN
    num_fix := 0;
    DBMS_REPAIR.FIX_CORRUPT_BLOCKS (
    SCHEMA_NAME => 'SYS',
    OBJECT_NAME=> 'I_PROCEDUREPLSQL$',
    OBJECT_TYPE => dbms_repair.INDEX_OBJECT,
    REPAIR_TABLE_NAME => 'REPAIR_TABLE',
    FIX_COUNT=> num_fix);
    DBMS_OUTPUT.PUT_LINE('num fix: ' || TO_CHAR(num_fix));
    END;

    num fix: 0 was returned.
    Corrupt block could not be fixed

  5. It was a UNIQUE index on procedures. The index was dropped!

  6. Trying to recreate the index failed due to duplicate records

  7. From the object ID, the problematic procedure (from our application) was located and dropped.

  8. Index creation was successful.

  9. Application procedure which was dropped was re-created.

  10. Login to the application was successful.

  11. DB Verify still gives the same error informing that a block has been marked as corrupt and is not usable.

Monday, January 11, 2010

Using AWE to improve Oracle performance

Problem:
Hardware:

  1. 4 x Dual core Intel Xeon processors

  2. 12 GB of physical RAM

  3. 2 x 74 GB SATA Disks configured as RAID-0 (RAID-1 removed to increase performance. Data security done using archiving and automated backups).

Despite having a high performance configuration, Oracle Database 10g R2 (Version 10.2.0.4) was reporting problems with speed. Typical user complaints were as follows


  • Startup time for login screen is high.

  • Transition between screens is slow.

  • Execution of programs within a screen is fast.

  • Time lag (Freeze) experienced (anything between 0.5 second to 5 seconds) while traversing between multiple records in one screen.


Analysis:
The Oracle Database was tuned manually. All the values for Pool size and SGA, PGA targets were provided manually in the SPFILE during installation.
Some of them were as follows:

  • _db_cache_size=989855744

  • _large_pool_size=25165824

  • java_pool_size=512165824

  • shared_pool_size=233554432

  • sga_max_size=2500016000

  • sga_target=2500016000

  • pga_aggregate_target=262144000


The /3gb switch was turned on for the Operating system. oracle.exe process was able to acquire upto 2.5 GB physical memory. But the performance problems continued. The complete 12GB of physical RAM was also unutilised most of the time.

Solution:
Windows Address Windowing Extension (AWE) was used to increase the Oracle Data Buffer size. The Windows AWE is actually a set of extensions that allows applications like Oracle Database to manipulate physical memory greater than 4GB on 32-bit Operating systems. AWE allows fast memory management.

How To:
To use the Windows AWE, the following was done.

  1. Turn on /PAE (Physical Address Extension) and /3gb switch on the Operating System so that more than 2GB of addressable space is available to applications.

  2. Set the parameter AWE_WINDOW_MEMORY to a suitable value in the registry.
    Parameter is set in HKEY_LOCAL_MACHINE\Software\Oracle\(Oracle_Home)
    Value used: 536870912

  3. In the init.ora set USE_INDIRECT_DATA_BUFFERS=TRUE

  4. In the init.ora set DB_BLOCK_BUFFERS to a suitable value.
    Value used: 850000

  5. The above should be sufficient for most databases. But we use poi Java utilities to import/export data to excel that requires a minimum of 500 MB Java Pool size.
    Hence, in init.ora JAVA_POOL_SIZE=512165824

  6. An error was encountered on starting up the database that said that there was insufficient Streams Pool size. For which in init.ora, we set
    STREAMS_POOL_SIZE=100M


Note: Oracle's Metalink note - 225349.1 has a detailed description on using AWE and the calculations needed to arrive at appropriate values for AWE_WINDOW_MEMORY and DB_BLOCK_BUFFERS.

On starting up the database, we can see that Oracle acquired upto 9GB of physical memory and all the performance related problems from users were addressed.

Problems encountered:

  • If the DB_BLOCK_BUFFERS or AWE_WINDOW_MEMORY value is incorrect, we get an
    ORA-27102: out of memory Error followed by
    O/S-Error: (OS 8) Not enough storage is available to process this command


The init.ora used is attached herewith:

_db_block_lru_latches=32
audit_file_dest='C:\admin\(db_name)\adump'
background_dump_dest='C:\admin\(db_name)\bdump'
compatible='10.2.0.3.0'
control_files='D:\(db_name)\CONTROLFILE\(controlfilename).CTL'
core_dump_dest='C:\admin\(db_name)\cdump'
db_block_buffers=850000
db_block_size=8192
db_create_file_dest='D:\(db_name)'
db_domain=''
db_file_multiblock_read_count=16
db_name=(db_name)
dispatchers='(protocol=TCP)'
java_pool_size=512165824
job_queue_processes=10
log_buffer=8388608
open_cursors=3000
processes=150
remote_login_passwordfile='EXCLUSIVE'
shared_pool_size=1468006400
shared_servers=5
streams_pool_size=100M
undo_management='AUTO'
undo_tablespace='UNDOTBS1'
use_indirect_data_buffers=TRUE
user_dump_dest='C:\admin\(db_name)\udump'
log_archive_format=Log_%s_%t_%r.arc
log_archive_dest='D:\(db_name)\ARCHIVE'

Wednesday, December 23, 2009

Registering for Triangle Tennis Trust tournament (TTT)

MLC has developed an application to manage the registrations for the upcoming tournament by Triangle Tennis trust in Chennai. The application has been developed using Microsoft's Silverlight technology. The current blog post will guide you on how to go about the process of registration.

Step I: Install Silverlight

  1. Go to the registration website http://mlc.org.in

  2. If Microsoft's Silverlight is not installed on your system, the browser will prompt you to install it. (View screen shot)
    (If Silverlight is already installed ignore the subsequent steps and move to Step II of registration)

  3. Install Silverlight
  4. You will be prompted to Run or Save the installer file. Click on Save and save the to a local folder. In case, you have subsequent problems with installation you can utilise this file later.


  5. Run the downloaded file.


  6. Install Silverlight to your computer.


  7. The browser will refresh automatically to launch the website. If it does not, then close your browser and try to log on to the website http://mlc.org.in again.


Step II: Register
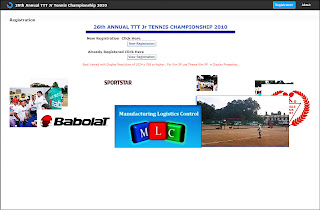
You should see a screen with 2 buttons on the main page as follows:


Click on "New Registration" to register.


For fields like Date of Birth, click the box with an icon mentioning "15" which will pop-up a small window for date selection. To change the year, click on the top of that window which reads the date, month (For e.g. January, 2000). Select the appropriate year and click 'OK'.

Step III: View Registration
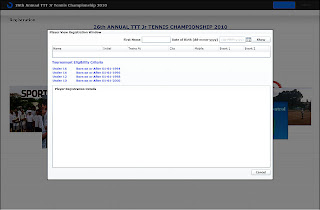
To view your registration details, click on 'View Registration' on the main screen. On the subsequent screen, provide your first name, Date of Birth and click on 'Show' to view your details.


Note: The application has been tested on the following browsers.

  1. Internet Explorer 8

  2. Opera (Version 10 and above)

  3. Safari

  4. Firefox (Version 3.5 and above)

  5. Chrome


For any further support, use our forum - Click here for the forum